

LAMP Stack on Ubuntu
Before we describe the procedure on how to setup LAMP stack on Ubuntu 20.04, let's first understand the Four Layers of a LAMP Stack.
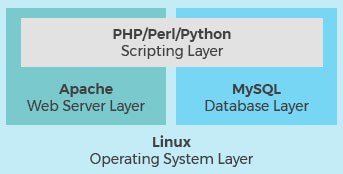
Linux based web servers consist of four software components, they are arranged in layers which interacts with each other, make up the software stack.
Websites and Web Applications run on top of this underlying stack. The common software components that make up a traditional LAMP stack are:
Linux: The operating system (OS) makes up our first layer. Linux sets the foundation for the stack model. All other layers run on top of this layer. we plan to use Ubuntu 20.04 version on Linux operating system.
Apache: The second layer consists of web server software, typically Apache Web Server. This layer resides on top of the Linux layer. Web servers are responsible for translating from web browsers to their correct website.
MySQL: Our third layer is where databases live. MySQL stores details that can be queried by scripting to construct a website, It usually sits on top of the Linux layer alongside Apache/layer 2. In high end configurations, MySQL can be off loaded to a separate host server.
PHP: Sitting on top of them all is our fourth and final layer. The scripting layer consists of PHP and/or other similar web programming languages. Websites and Web Applications run within this layer.
To install LAMP stack on Ubuntu 22.04 follow the procedure mentioned below
Install LAMP Stack / Apache on Ubuntu
sudo apt-get install apache2 apache2-utilsCheck Status, Start and Enable Apache2 on boot
sudo systemctl status apache2
sudo systemctl start apache2
sudo systemctl enable apache2
Check Apache Version
apache2 -vNow type in the public IP address of your Ubuntu 20.04 server in the browser address bar. You should see the “It works!” Web page, which means Apache Web server is running properly. If you are installing LAMP on your local Ubuntu 20.04 computer, then type 127.0.0.1 or localhost in the browser address bar it should show up Apache Ubuntu Default Page.
By default, Apache uses the system hostname as its global ServerName. If the system hostname can’t be resolved in DNS, then you will probably see the following error after running command
sudo apache2ctl -tAH00558: apache2: Could not reliably determine the server's fully qualified domain name, using 127.0.0.1.
Set the 'ServerName' directive globally to suppress this message, to solve this problem, we can set a global ServerName in Apache. Use the Nano command-line text editor to create a new configuration file
sudo vi /etc/apache2/conf-available/servername.confand Add the following line in this file
ServerName localhostSave and close the file. To save a file in Nano text editor, press Ctrl+O, then press Enter to confirm. To exit, press Ctrl+X. Then enable this config file.
sudo a2enconf servername.confReload Apache for the change to take effect.
sudo systemctl reload apache2Now if you run the sudo apache2ctl -t command again, you won’t see the above error message.
Install MariaDB (MySQL) database
sudo apt install mariadb-server mariadb-clientCheck Status, Start and Enable MariaDB on boot
sudo systemctl status mariadb
sudo systemctl start mariadb
sudo systemctl enable mariadb
Install PHP 8.1 Modules
sudo apt install libapache2-mod-php8.1 php8.1-cli php8.1-common php8.1-mbstring php8.1-gd php8.1-intl php8.1-xml php8.1-mysql php8.1-zip php8.1-dev php8.1-curl php8.1-fpm php8.1-bz2 php8.1-ldap php-dompdf php-apcu imagemagick php-imagick redis-server php-redis unzip php8.1-opcache php8.1-readline php8.1-bcmath php8.1-gmpDisable PHP 8.1 and mpm_prefork and enable php8.1-fpm with mpm_event
sudo a2dismod php8.1
sudo a2dismod mpm_prefork
sudo a2enmod proxy_fcgi setenvif mpm_event
sudo service apache2 restart
sudo a2enconf php8.1-fpm
sudo service apache2 restart
Check the PHP Version
php --versionTo test PHP scripts with Apache server, we need to create a info.php file in the document root directory.
sudo vi /var/www/html/info.phpand Paste the following PHP code into the file.
<?php phpinfo(); ?>
Now in the browser address bar, enter server-ip-address/info.php. Replace server-ip-address, You should see your server’s PHP information. This means PHP scripts can run properly with Apache web server.
if you need to host your own website or your own cloud instance like Nextcloud, the prerequite is going to be LAMP stack up and running on your Ubuntu instance, read more on how to setup by clicking on the below posts


Recent Comments